Course 9:RGB_Strip
Learning Objectives
Learn the basic methods of using ESP32 to control RGB LED strips, understand their color mixing and data transmission principles, and implement web-based remote control functionality.
Required Component
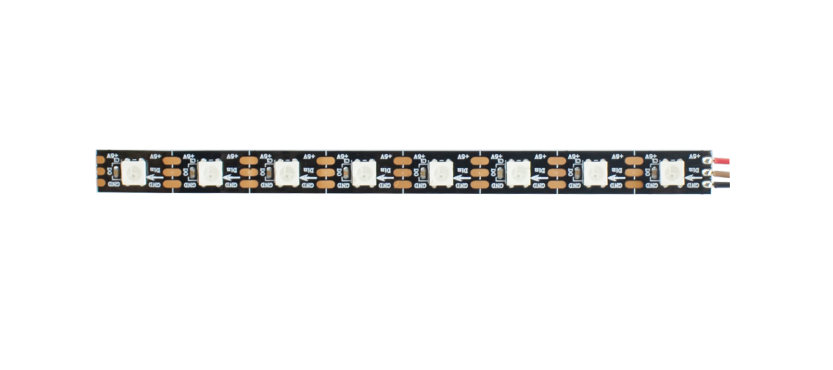
RGB Strip
Working Principle
RGB strip integrate red, green, and blue LEDs with a control chip. Each LED can independently receive and parse 24-bit color data(8 bits R, 8 bits G, 8 bits B)from a single-wire serial bus(DIN pin).
The control chip distinguishes between “0” and “1” using strict timing signals(high and low level pulse width encoding)and sequentially transmits the data to the next LED, thus achieving pixel-by-pixel color control and dynamic lighting effects.
Wiring
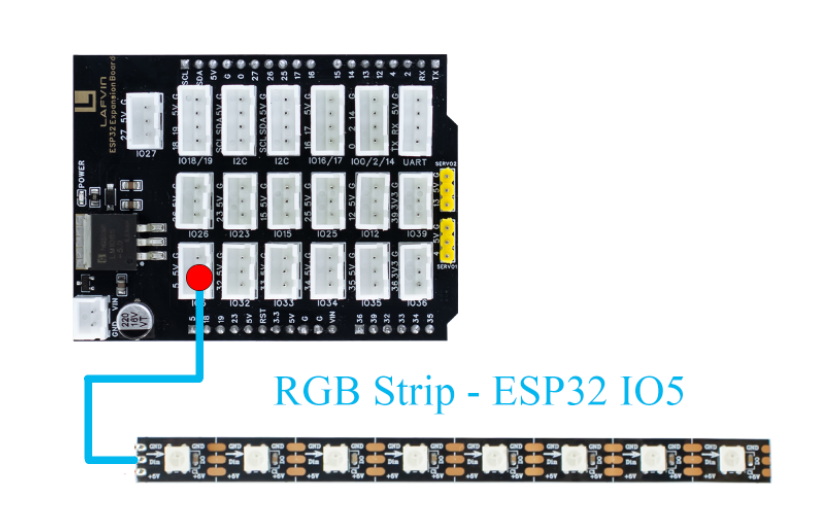
RGB Strip —— ESP32 IO5
Example Code
#include <WiFi.h>
#include <WebServer.h>
#include <Adafruit_NeoPixel.h>
#include <Preferences.h>

// ===== NeoPixel setup =====
const uint8_t LED_PIN    = 5;   // Data pin for the LED strip
const uint16_t NUMPIXELS = 8;   // Number of LEDs
Adafruit_NeoPixel strip(NUMPIXELS, LED_PIN, NEO_GRB + NEO_KHZ800);

// ===== Web server =====
WebServer server(80);

// ===== Current state =====
bool stripOn = false;
uint8_t colR = 255;
uint8_t colG = 0;
uint8_t colB = 0;

// ===== WiFi Configuration =====
const char* apSSID = "RGB_Strip";  // Access Point SSID (no password)
const char* apPassword = NULL;          // No password

String wifiSSID = "";        // Store target WiFi SSID
String wifiPassword = "";    // Store target WiFi password

bool isConfigMode = true;    // Configuration mode flag
bool wifiConnected = false;  // WiFi connection status

// ===== Preferences for storing WiFi credentials =====
Preferences preferences;

// Forward declarations
String htmlPage();
String configHTMLPage();
void handleRoot();
void handleSet();
void handleConfigure();
void applyColor();
bool connectToWiFi();
void setupAccessPoint();

void setup() {
  Serial.begin(115200);
  delay(200);

  strip.begin();
  strip.show();
  strip.setBrightness(150);

  // Initialize preferences
  preferences.begin("wifi-config", false);

  // Try to load saved WiFi credentials
  wifiSSID = preferences.getString("ssid", "");
  wifiPassword = preferences.getString("password", "");

  Serial.println("=== ESP32 RGB LED Controller ===");

  if (wifiSSID != "" && connectToWiFi()) {
    // Successfully connected to WiFi
    isConfigMode = false;
    wifiConnected = true;
    Serial.println("Mode: Station (Connected to WiFi)");
  } else {
    // Enter configuration mode (Access Point)
    isConfigMode = true;
    wifiConnected = false;
    setupAccessPoint();
    Serial.println("Mode: Access Point (Configuration)");
  }

  server.on("/", HTTP_GET, handleRoot);
  server.on("/set", HTTP_GET, handleSet);
  server.on("/configure", HTTP_POST, handleConfigure);
  server.begin();
  Serial.println("Web server started!");

  applyColor();
}

void loop() {
  server.handleClient();
}

// ===== Connect to WiFi =====
bool connectToWiFi() {
  if (wifiSSID == "") return false;

  Serial.println("Attempting to connect to WiFi: " + wifiSSID);
  WiFi.begin(wifiSSID.c_str(), wifiPassword.c_str());

  int attempts = 0;
  while (WiFi.status() != WL_CONNECTED && attempts < 20) {
    delay(500);
    Serial.print(".");
    attempts++;
  }

  if (WiFi.status() == WL_CONNECTED) {
    Serial.println("\nWiFi connected successfully!");
    Serial.println("IP address: " + WiFi.localIP().toString());
    return true;
  } else {
    Serial.println("\nFailed to connect to WiFi");
    return false;
  }
}

// ===== Setup Access Point =====
void setupAccessPoint() {
  Serial.println("Setting up Access Point...");
  WiFi.softAP(apSSID, apPassword);
  Serial.println("Access Point started");
  Serial.println("SSID: " + String(apSSID));
  Serial.println("Password: None (Open Network)");
  Serial.println("IP address: " + WiFi.softAPIP().toString());
}

void handleRoot() {
  if (isConfigMode) {
    server.send(200, "text/html", configHTMLPage());
  } else {
    server.send(200, "text/html", htmlPage());
  }
}

void handleSet() {
  if (server.hasArg("on")) {
    String s = server.arg("on");
    stripOn = (s == "1" || s == "true");
  }
  if (server.hasArg("r")) colR = (uint8_t)constrain(server.arg("r").toInt(), 0, 255);
  if (server.hasArg("g")) colG = (uint8_t)constrain(server.arg("g").toInt(), 0, 255);
  if (server.hasArg("b")) colB = (uint8_t)constrain(server.arg("b").toInt(), 0, 255);

  applyColor();
  server.send(200, "text/plain", "OK");
}

void handleConfigure() {
  wifiSSID = server.arg("ssid");
  wifiPassword = server.arg("password");

  // Save credentials to preferences
  preferences.putString("ssid", wifiSSID);
  preferences.putString("password", wifiPassword);

  server.send(200, "text/html",
              "<html><body><h2>Connecting to WiFi...</h2>"
              "<p>SSID: " + wifiSSID + "</p>"
              "<p>Device will restart and attempt connection.</p>"
              "<script>setTimeout(() => { location.href = '/'; }, 3000);</script>"
              "</body></html>");

  delay(2000);
  ESP.restart();
}

void applyColor() {
  if (stripOn) {
    uint32_t c = strip.Color(colR, colG, colB);
    for (uint16_t i = 0; i < NUMPIXELS; i++) strip.setPixelColor(i, c);
  } else {
    for (uint16_t i = 0; i < NUMPIXELS; i++) strip.setPixelColor(i, 0);
  }
  strip.show();
}

// ===== Configuration Web Page HTML =====
String configHTMLPage() {
  String html = R"rawliteral(
<!DOCTYPE html>
<html>
<head>
  <meta charset="utf-8">
  <meta name="viewport" content="width=device-width,initial-scale=1">
  <title>ESP32 WiFi Configuration</title>
  <style>
    body {
      font-family: 'Segoe UI', Tahoma, sans-serif;
      background: radial-gradient(circle at top, #d7f3ff, #eef6ff);
      text-align: center;
      padding: 20px;
      color: #222;
    }
    .container {
      background: white;
      border-radius: 18px;
      padding: 24px;
      box-shadow: 0 6px 25px rgba(0,0,0,0.1);
      max-width: 420px;
      margin: auto;
    }
    h1 {
      font-size: 22px;
      margin-bottom: 16px;
      color: #0078ff;
    }
    input {
      width: 100%;
      padding: 12px;
      margin: 10px 0;
      border: 1px solid #ccc;
      border-radius: 8px;
      box-sizing: border-box;
      font-size: 16px;
    }
    button {
      width: 100%;
      padding: 12px;
      margin-top: 15px;
      font-size: 17px;
      background-color: #0078ff;
      color: white;
      border: none;
      border-radius: 8px;
      cursor: pointer;
      transition: all 0.3s ease;
    }
    button:hover {
      background-color: #005cbf;
    }
  </style>
</head>
<body>
  <div class="container">
    <h1>WiFi Configuration</h1>
    <form action="/configure" method="POST">
      <input type="text" name="ssid" placeholder="WiFi SSID" required>
      <input type="password" name="password" placeholder="WiFi Password" required>
      <button type="submit">Connect</button>
    </form>
  </div>
</body>
</html>
)rawliteral";
  return html;
}

// ===== Control Web Page HTML =====
String htmlPage() {
  String html = R"rawliteral(
<!DOCTYPE html>
<html>
<head>
  <meta charset="utf-8">
  <meta name="viewport" content="width=device-width,initial-scale=1">
  <title>ESP32 RGB Controller</title>
  <style>
    body {
      font-family: 'Segoe UI', Tahoma, sans-serif;
      background: radial-gradient(circle at top, #d7f3ff, #eef6ff);
      text-align: center;
      padding: 20px;
      color: #222;
    }
    .container {
      background: white;
      border-radius: 18px;
      padding: 24px;
      box-shadow: 0 6px 25px rgba(0,0,0,0.1);
      max-width: 420px;
      margin: auto;
    }
    h1 {
      font-size: 22px;
      margin-bottom: 16px;
      color: #0078ff;
    }
    #powerBtn {
      width: 70px;
      height: 70px;
      border-radius: 50%;
      border: none;
      background: linear-gradient(145deg, #eee, #ccc);
      box-shadow: 0 4px 8px rgba(0,0,0,0.2);
      cursor: pointer;
      margin-bottom: 10px;
      transition: all 0.2s ease;
    }
    #powerBtn.on {
      background: radial-gradient(circle, #00e676, #00c853);
      color: white;
      box-shadow: 0 0 20px #00e676;
    }
    #powerBtn svg {
      width: 30px;
      height: 30px;
      fill: #444;
    }
    #powerBtn.on svg {
      fill: white;
    }
    .slider {
      margin-top: 15px;
      text-align: left;
    }
    label {
      font-weight: bold;
      display: flex;
      justify-content: space-between;
    }
    input[type=range] {
      width: 100%;
      height: 12px;
      border-radius: 6px;
      -webkit-appearance: none;
      background: #ddd;
      outline: none;
    }
    #r {background: linear-gradient(to right, black, red);}
    #g {background: linear-gradient(to right, black, lime);}
    #b {background: linear-gradient(to right, black, blue);}
    .preview {
      width: 100%;
      height: 60px;
      border-radius: 10px;
      margin-top: 18px;
      border: 1px solid #ccc;
      box-shadow: inset 0 0 8px rgba(0,0,0,0.1);
    }
    .stateText {
      margin-bottom: 10px;
      font-size: 15px;
      color: #555;
    }
  </style>
</head>
<body>
  <div class="container">
    <h1>ESP32 RGB LED Controller</h1>
    <button id="powerBtn" title="Power">
      <svg viewBox="0 0 512 512"><path d="M256 0c-17.7 0-32 14.3-32 32v224c0 17.7 14.3 32 32 32s32-14.3 32-32V32c0-17.7-14.3-32-32-32zM384 64c-17.7 0-32 14.3-32 32 0 8.8 3.6 16.8 9.4 22.6C392.6 157.3 416 206.6 416 256c0 88.4-71.6 160-160 160S96 344.4 96 256c0-49.4 23.4-98.7 54.6-137.4C156.4 112.8 160 104.8 160 96c0-17.7-14.3-32-32-32-9.4 0-18.3 4.1-24.3 11.1C65.2 122.1 32 187.6 32 256c0 123.7 100.3 224 224 224s224-100.3 224-224c0-68.4-33.2-133.9-71.7-180.9C402.3 68.1 393.4 64 384 64z"/></svg>
    </button>
    <div class="stateText">Current State: <span id="stateText">OFF</span></div>

    <div class="slider">
      <label>R <span id="rVal">255</span></label>
      <input type="range" id="r" min="0" max="255" value="255">
    </div>
    <div class="slider">
      <label>G <span id="gVal">0</span></label>
      <input type="range" id="g" min="0" max="255" value="0">
    </div>
    <div class="slider">
      <label>B <span id="bVal">0</span></label>
      <input type="range" id="b" min="0" max="255" value="0">
    </div>

    <div class="preview" id="preview"></div>
  </div>

<script>
let stripOn = )rawliteral";

  html += (stripOn ? "true" : "false");
  html += R"rawliteral(;
let r = )rawliteral";
  html += String(colR);
  html += R"rawliteral(;
let g = )rawliteral";
  html += String(colG);
  html += R"rawliteral(;
let b = )rawliteral";
  html += String(colB);
  html += R"rawliteral(;

const powerBtn = document.getElementById('powerBtn');
const stateText = document.getElementById('stateText');
const rSlider = document.getElementById('r');
const gSlider = document.getElementById('g');
const bSlider = document.getElementById('b');
const rVal = document.getElementById('rVal');
const gVal = document.getElementById('gVal');
const bVal = document.getElementById('bVal');
const preview = document.getElementById('preview');

function updateUI(){
  rSlider.value=r; gSlider.value=g; bSlider.value=b;
  rVal.textContent=r; gVal.textContent=g; bVal.textContent=b;
  preview.style.background='rgb('+r+','+g+','+b+')';
  stateText.textContent=stripOn?'ON':'OFF';
  if(stripOn) powerBtn.classList.add('on'); else powerBtn.classList.remove('on');
}
updateUI();

function sendState(){
  fetch(`/set?on=${stripOn?1:0}&r=${r}&g=${g}&b=${b}`).catch(e=>console.log(e));
}

powerBtn.addEventListener('click',()=>{
  stripOn=!stripOn;
  updateUI();
  sendState();
});

[rSlider,gSlider,bSlider].forEach(sl=>{
  sl.addEventListener('input',()=>{
    r=rSlider.value; g=gSlider.value; b=bSlider.value;
    updateUI();
    sendState();
  });
});
</script>
</body>
</html>
)rawliteral";

  return html;
}
Code burning options
You can directly copy the code provided above into the Arduino IDE for burning.
Find the 9.RGB_Strip.ino file in the provided folder, download it, open it with the Arduino IDE, and burn the program to the ESP32 development board.
Find the 9.RGB_Strip.bin file in the provided folder, download it and use Flash Download Tool to flash the program to the ESP32 development board.
Effects Demonstration
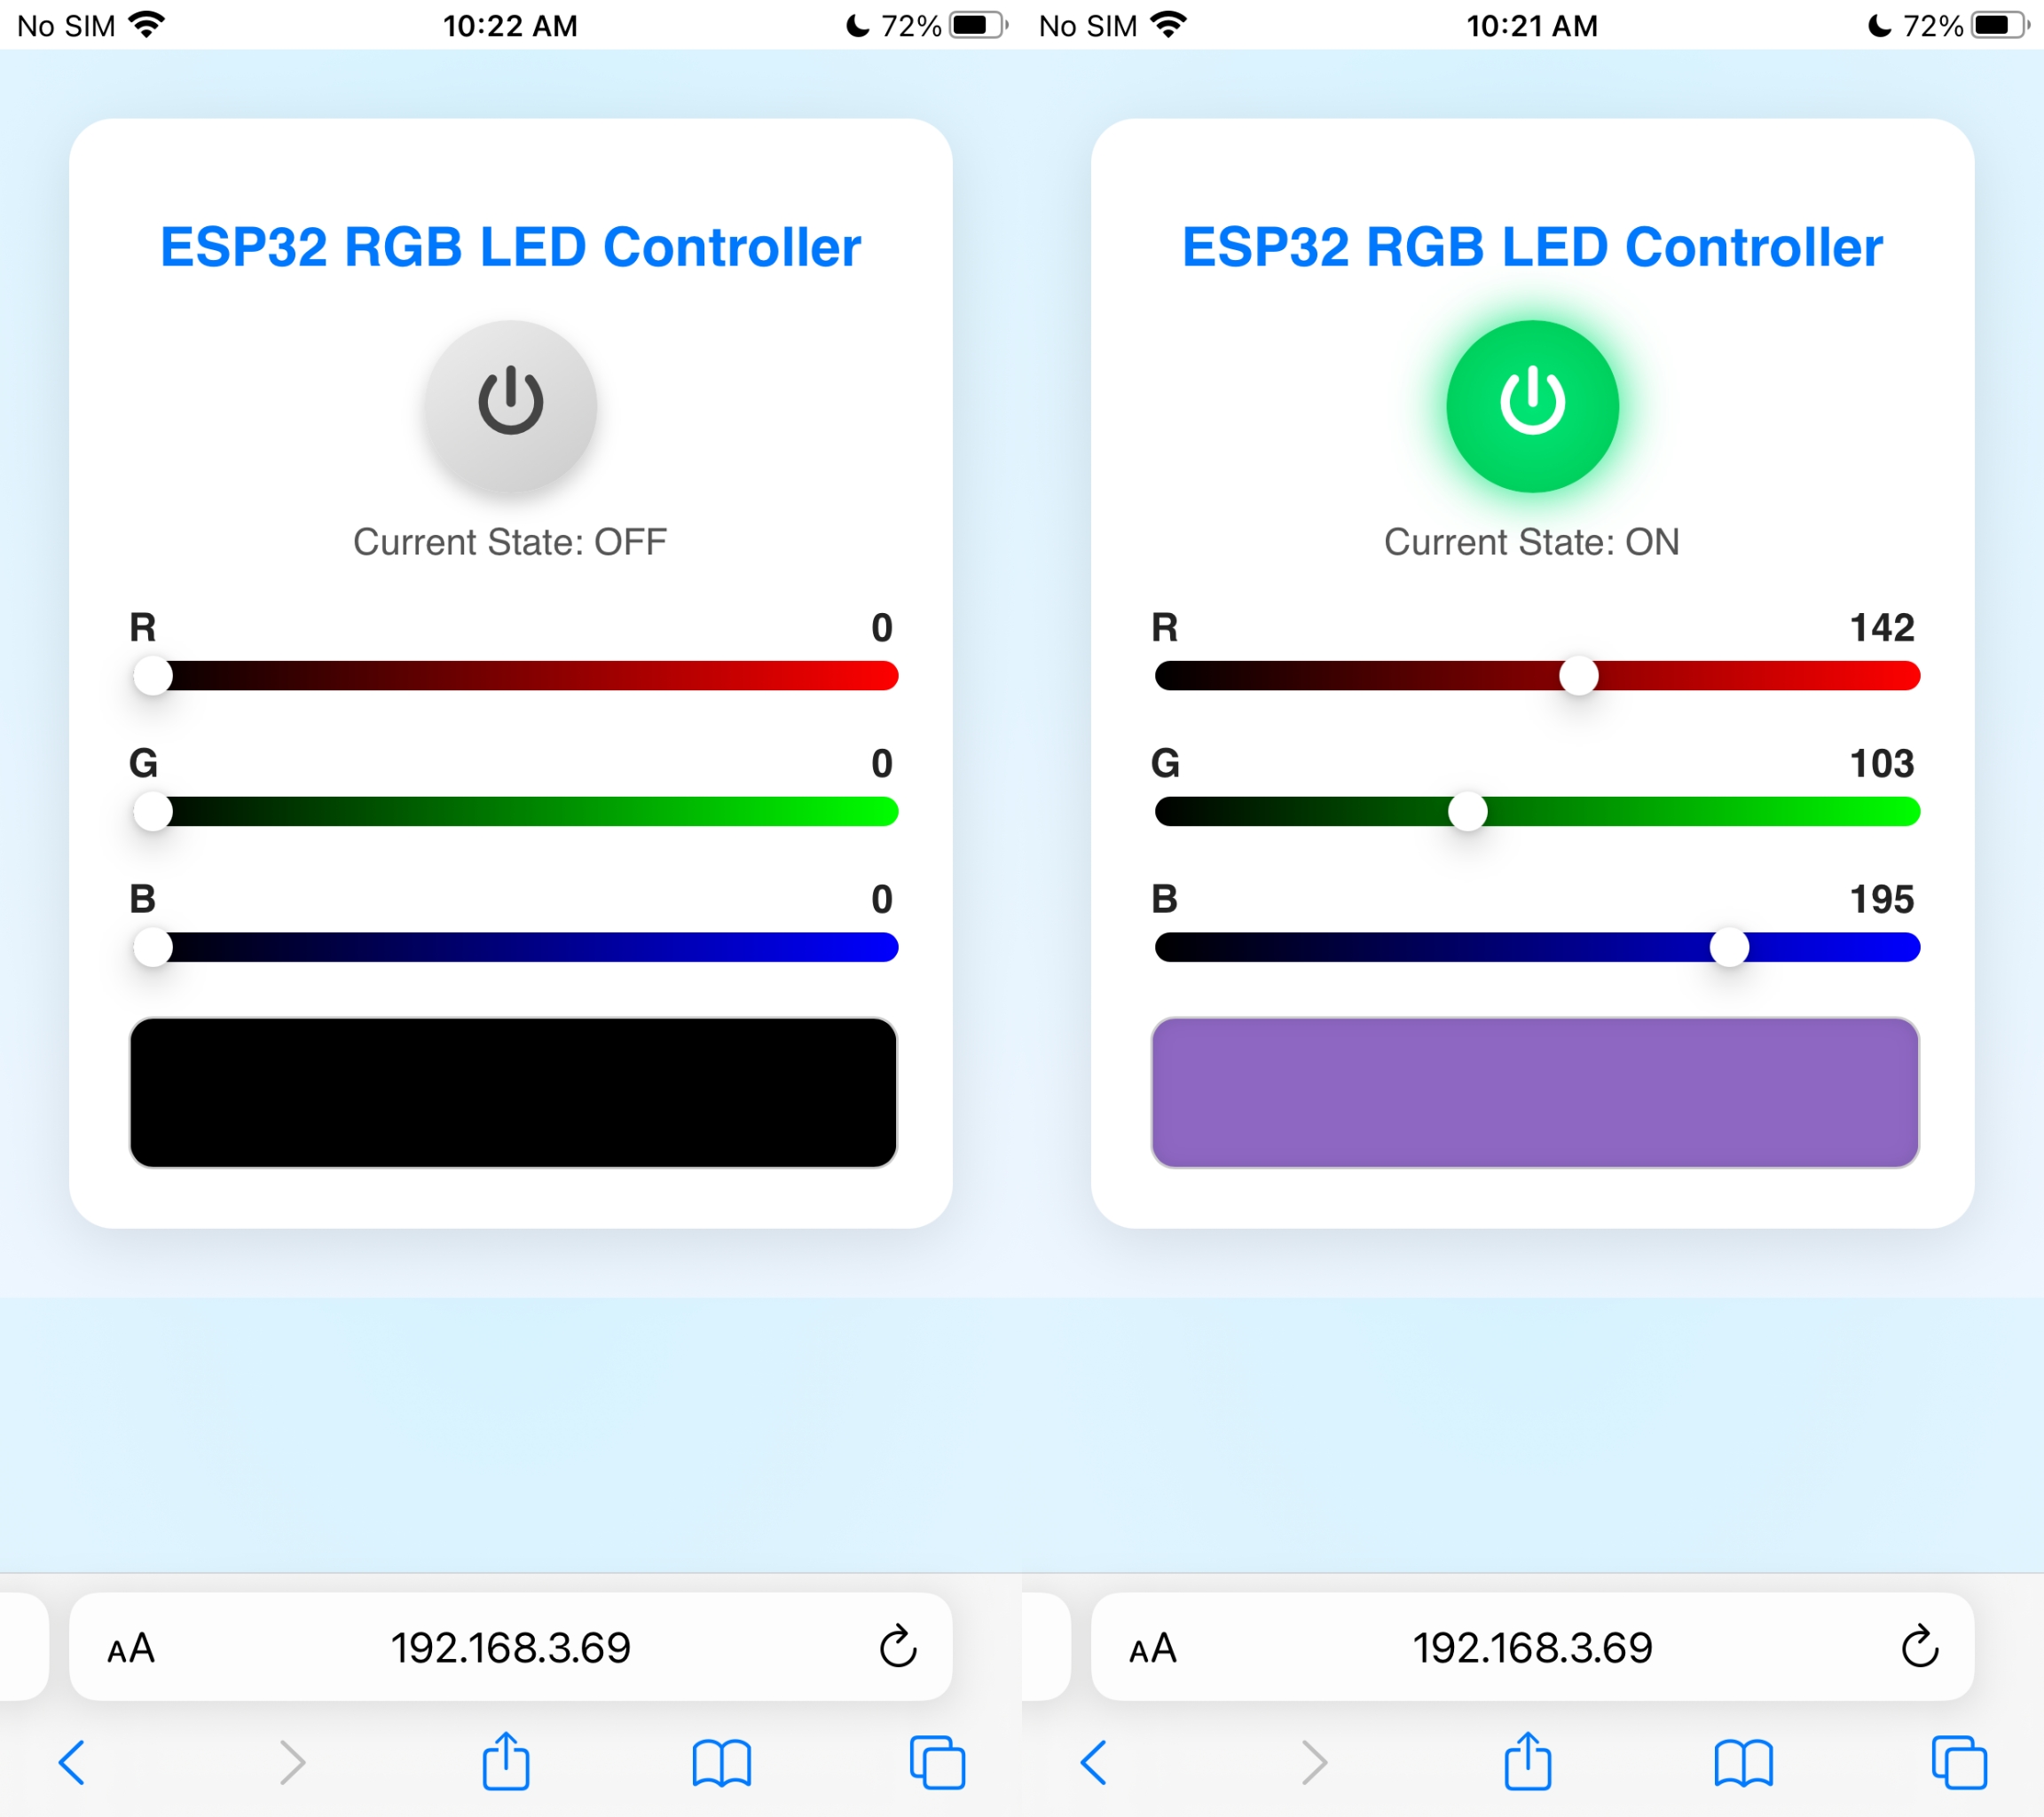
The web control page includes: a power button(to turn the RGB lights on and off), an RGB slider(to adjust the color), a color preview area, and a status display(ON / OFF).