Course 1:Button_LED
Learning Objectives
Master the basic principles of ESP32 digital input/output;
Build a web server based on ESP32 to achieve remote control via web page;
Understand the synchronization mechanism between physical buttons and web page control;
Be familiar with the interaction between the HTML + CSS + JavaScript front-end and the ESP32 back-end;
Ultimately, complete a simple and aesthetically pleasing LED control system with real-time status updates.
Required Component
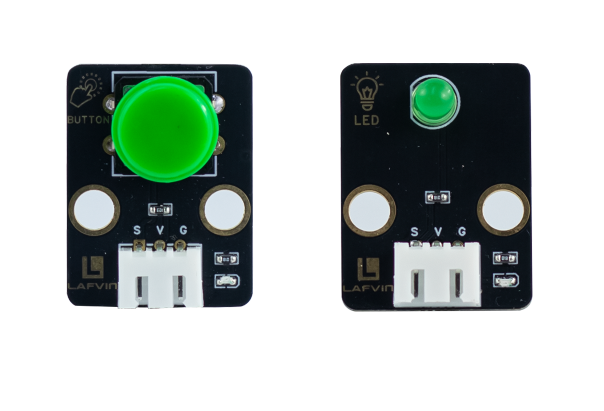
LED Module、Button Module
Working Principle
LED Module:LED(Light Emitting Diode)is a semiconductor device that converts electrical energy into light energy. Its working principle is based on the electron-hole recombination effect when a PN junction is forward-biased, resulting in light emission.
Button Module:Structurally, it is a mechanical contact switch. When pressed, the two contacts close, and the circuit is completed; when released, the contacts open, and the circuit is broken.
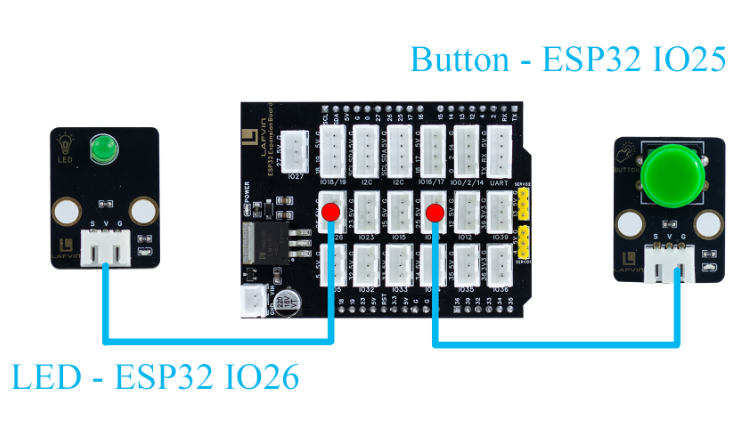
Wiring
LED Module —— ESP32 IO26
Button Module —— ESP32 IO25
Example Code
#include <WiFi.h>
#include <WebServer.h>
#include <Preferences.h>

// ---------- Hardware Definitions ----------
const int ledPin = 26;       // LED pin
const int buttonPin = 25;    // Physical button pin

bool ledState = false;       // LED state
bool lastButtonState = HIGH; // Last button state

// ---------- WiFi Configuration ----------
const char* apSSID = "Button_LED";  // Access Point SSID (no password)
const char* apPassword = NULL;      // No password

String wifiSSID = "";        // Store target WiFi SSID
String wifiPassword = "";    // Store target WiFi password

bool isConfigMode = true;    // Configuration mode flag
bool wifiConnected = false;  // WiFi connection status

// ---------- Create Web Server ----------
WebServer server(80);

// ---------- Preferences for storing WiFi credentials ----------
Preferences preferences;

// ---------- HTML Configuration Page ----------
String configHTMLPage() {
  String html = "<!DOCTYPE html><html><head>";
  html += "<title>ESP32 WiFi Configuration</title>";
  html += "<meta name='viewport' content='width=device-width, initial-scale=1.0'>";
  html += "<style>"
          "body { font-family: Arial, sans-serif; margin: 20px; background-color: #f5f5f5; }"
          ".container { max-width: 400px; margin: 0 auto; background: white; padding: 20px; border-radius: 10px; box-shadow: 0 2px 10px rgba(0,0,0,0.1); }"
          "h2 { text-align: center; color: #333; }"
          "input, button { width: 100%; padding: 12px; margin: 8px 0; border: 1px solid #ddd; border-radius: 5px; box-sizing: border-box; }"
          "button { background-color: #4CAF50; color: white; border: none; cursor: pointer; font-size: 16px; }"
          "button:hover { background-color: #45a049; }"
          "</style></head><body>";

  html += "<div class='container'>";
  html += "<h2>WiFi Configuration</h2>";

  html += "<form action='/configure' method='POST'>";
  html += "<input type='text' name='ssid' placeholder='WiFi SSID' required>";
  html += "<input type='password' name='password' placeholder='WiFi Password' required>";
  html += "<button type='submit'>Connect</button>";
  html += "</form>";

  html += "</div></body></html>";
  return html;
}

// ---------- HTML Control Page (Original Design) ----------
String controlHTMLPage() {
  String html = "<!DOCTYPE html><html><head>";
  html += "<title>ESP32 LED Control</title>";
  html += "<meta name='viewport' content='width=device-width, initial-scale=1.0'>";
  html += "<style>"
          "body {"
          "  font-family: Arial, sans-serif;"
          "  display: flex;"
          "  flex-direction: column;"
          "  justify-content: center;"
          "  align-items: center;"
          "  height: 100vh;"
          "  margin: 0;"
          "  background-color: #f0f0f0;"
          "}"
          "h2 { color: #333; margin-bottom: 20px; }"

          "/* LED bulb icon */"
          "#ledIcon { width: 60px; height: 100px; margin: 20px auto; position: relative; }"
          "#ledIcon .bulb { width: 60px; height: 60px; border-radius: 50%; background-color: #f44336; margin: 0 auto; transition: background-color 0.3s, box-shadow 0.3s; }"
          "#ledIcon .base { width: 30px; height: 20px; background-color: #555; margin: -5px auto 0 auto; border-radius: 5px; }"

          "#ledState { font-weight: bold; font-size: 1.5em; margin: 10px; }"
          "button { padding: 15px 30px; font-size: 1.2em; border: none; border-radius: 8px; cursor: pointer; margin-bottom: 30px; }"
          ".on { background-color: #4CAF50; color: white; }"
          ".off { background-color: #f44336; color: white; }"
          "</style></head><body>";

  html += "<h2>ESP32 LED Control</h2>";

  html += "<div id='ledIcon'><div class='bulb'></div><div class='base'></div></div>";
  html += "<p>LED Status: <span id='ledState'>" + String(ledState ? "ON" : "OFF") + "</span></p>";
  html += "<button id='ledButton' class='" + String(ledState ? "on" : "off") + "' onclick='toggleLED()'>Button</button>";

  html += "<script>"
          "function toggleLED() {"
          "  fetch('/toggle').then(()=>updateState());"
          "}"
          "function updateState() {"
          "  fetch('/state').then(response=>response.text()).then(data=>{"
          "    var state = data == '1';"
          "    document.getElementById('ledState').innerText = state ? 'ON' : 'OFF';"
          "    var btn = document.getElementById('ledButton');"
          "    btn.className = state ? 'on' : 'off';"
          "    var bulb = document.querySelector('#ledIcon .bulb');"
          "    if(state){"
          "      bulb.style.backgroundColor='#4CAF50';"
          "      bulb.style.boxShadow='0 0 20px #4CAF50, 0 0 40px #4CAF50, 0 0 60px #4CAF50';"
          "    } else {"
          "      bulb.style.backgroundColor='#f44336';"
          "      bulb.style.boxShadow='0 0 10px rgba(0,0,0,0.2)';"
          "    }"
          "  });"
          "}"
          "setInterval(updateState, 500);"
          "</script>";

  html += "</body></html>";
  return html;
}

// ---------- Setup Routes ----------
void setupRoutes() {
  server.on("/", [](){
    if (isConfigMode) {
      server.send(200, "text/html", configHTMLPage());
    } else {
      server.send(200, "text/html", controlHTMLPage());
    }
  });

  server.on("/configure", HTTP_POST, [](){
    wifiSSID = server.arg("ssid");
    wifiPassword = server.arg("password");

    // Save credentials to preferences
    preferences.putString("ssid", wifiSSID);
    preferences.putString("password", wifiPassword);

    server.send(200, "text/html",
                "<html><body><h2>Connecting to WiFi...</h2>"
                "<p>SSID: " + wifiSSID + "</p>"
                "<p>Device will restart and attempt connection.</p>"
                "<script>setTimeout(() => { location.href = '/'; }, 3000);</script>"
                "</body></html>");

    delay(2000);
    ESP.restart();
  });

  server.on("/toggle", [](){
    ledState = !ledState;
    server.send(200, "text/plain", ledState ? "1" : "0");
  });

  server.on("/state", [](){
    server.send(200, "text/plain", ledState ? "1" : "0");
  });
}

// ---------- Connect to WiFi ----------
bool connectToWiFi() {
  if (wifiSSID == "") return false;

  Serial.println("Attempting to connect to WiFi: " + wifiSSID);
  WiFi.begin(wifiSSID.c_str(), wifiPassword.c_str());

  int attempts = 0;
  while (WiFi.status() != WL_CONNECTED && attempts < 20) {
    delay(500);
    Serial.print(".");
    attempts++;
  }

  if (WiFi.status() == WL_CONNECTED) {
    Serial.println("\nWiFi connected successfully!");
    Serial.println("IP address: " + WiFi.localIP().toString());
    return true;
  } else {
    Serial.println("\nFailed to connect to WiFi");
    return false;
  }
}

// ---------- Setup Access Point ----------
void setupAccessPoint() {
  Serial.println("Setting up Access Point...");
  WiFi.softAP(apSSID, apPassword);
  Serial.println("Access Point started");
  Serial.println("SSID: " + String(apSSID));
  Serial.println("Password: None (Open Network)");
  Serial.println("IP address: " + WiFi.softAPIP().toString());
}

// ---------- Setup ----------
void setup() {
  Serial.begin(115200);

  // Initialize hardware
  pinMode(ledPin, OUTPUT);
  pinMode(buttonPin, INPUT_PULLUP);

  // Initialize preferences
  preferences.begin("wifi-config", false);

  // Try to load saved WiFi credentials
  wifiSSID = preferences.getString("ssid", "");
  wifiPassword = preferences.getString("password", "");

  Serial.println("=== ESP32 WiFi Configuration ===");

  if (wifiSSID != "" && connectToWiFi()) {
    // Successfully connected to WiFi
    isConfigMode = false;
    wifiConnected = true;
    Serial.println("Mode: Station (Connected to WiFi)");
  } else {
    // Enter configuration mode (Access Point)
    isConfigMode = true;
    wifiConnected = false;
    setupAccessPoint();
    Serial.println("Mode: Access Point (Configuration)");
  }

  setupRoutes();
  server.begin();
  Serial.println("Web server started");
}

// ---------- Main Loop ----------
void loop() {
  server.handleClient();

  // Button detection with debouncing
  bool buttonState = digitalRead(buttonPin);
  if (buttonState == LOW && lastButtonState == HIGH) {
    ledState = !ledState;
    delay(50); // Simple debouncing
  }
  lastButtonState = buttonState;

  // Control LED
  digitalWrite(ledPin, ledState ? HIGH : LOW);
}
Code burning options
You can directly copy the code provided above into the Arduino IDE for burning.
Find the 1.Button_LED.ino file in the provided folder, download it, open it with the Arduino IDE, and burn the program to the ESP32 development board.
Find the 1.Button_LED.bin file in the provided folder, download it and use Flash Download Tool to flash the program to the ESP32 development board.
Effects Demonstration
Press the button to turn on the LED light, and press it again to turn it off.
After opening the web control page, clicking the button on the webpage controls the LED light’s on/off state.
The webpage button and the physical button achieve synchronized control; operation on either will update the other’s status in real time, enabling two-way linkage.
server.on("/", [](){
    server.send(200, "text/html", HTMLPage());
});

server.on("/toggle", [](){
    ledState = !ledState;
    server.send(200, "text/plain", ledState ? "1" : "0");
});

server.on("/state", [](){
    server.send(200, "text/plain", ledState ? "1" : "0");
});
/toggle is used to toggle the LED state, and /state is used to read the LED state in real time via a webpage.
